Project Managers and Design Leads orienting a new starter
Anyone wondering why a sidebar item they were told about isn't showing
Required knowledge
None. This guide assumes you have just been given access and have not used Atarim before.
Tools & resources needed
An active Atarim workspace you've been invited to
The sidebar is your control center. A workspace switcher sits at the top, then seven navigation items grouped into two blocks, then help and support links at the bottom. Your agency's own identity — or Atarim's, if you haven't white labeled — anchors the very bottom of the panel.
What you actually see depends on your role and permissions. Several items are hidden entirely rather than greyed out, which is the most common reason a new starter can't find something a colleague told them about.
In this guide you'll learn what each item does, the exact click path through it, and which article to read for the full depth on any one of them.
Item
What it’s for
Who sees it
Projects
Your landing view — Claro’s chat panel beside the projects grid
Most roles
Inbox
Email-based client requests in the same task system as everything else
Most roles
Boards
Kanban view of a project’s tasks, arranged by status
Most roles
Workflows
Automations — triggers, actions and branching
Not Team Member
People
Your team and your clients, with roles and access
Admin only
Analytics
Workspace-wide activity and AI performance metrics
Not Team Member
Settings
Everything that applies across the whole workspace
Admin only
Note
Items you don’t have permission for are hidden, not disabled. If a colleague refers to a sidebar item you can’t see, that’s a permissions difference rather than a bug — an administrator can adjust it under Settings > Workspace > User Permissions.
Step-by-Step Guide
Step 1: Switching Workspaces
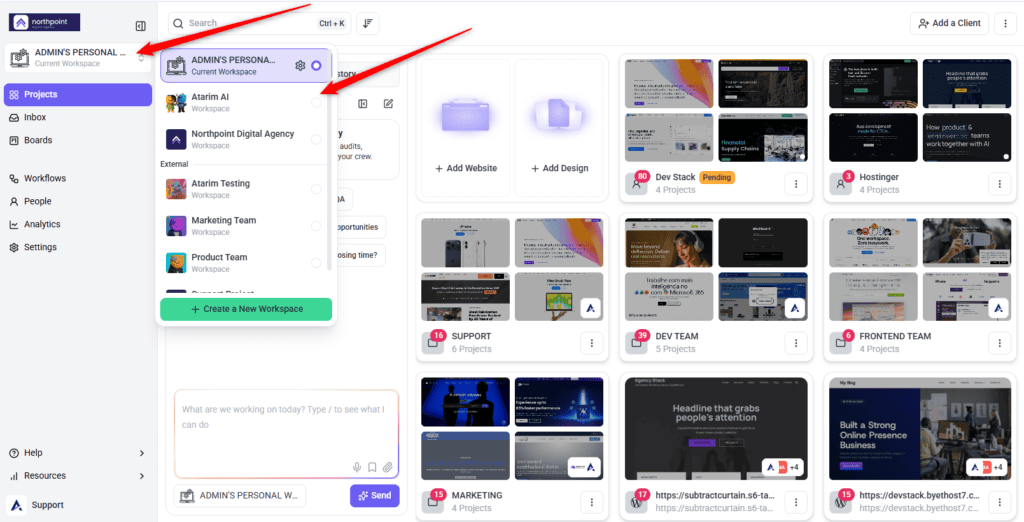
The switcher sits above everything else in the sidebar and shows the workspace you’re currently in.
Instructions:
Select the workspace name at the top of the sidebar.
Choose a different workspace from the list.
The whole screen reloads, scoped to that workspace’s own projects, team, and settings.
Workspace switcher with available workspaces to choose from
Note
The switcher only appears if you belong to more than one workspace, or if you have permission to view workspaces. A single-workspace user won’t see it at all.
Step 2: Projects
The default landing view when you log in, and where most people spend their time. It isn’t a bare project list — Claro’s chat panel sits alongside the projects grid on one screen.
Instructions:
Select Projects in the sidebar, or use the Atarim logo to return here from anywhere.
On the left, use the chat panel to talk to Claro. Quick-start prompts sit above the composer if you’re not sure where to begin.
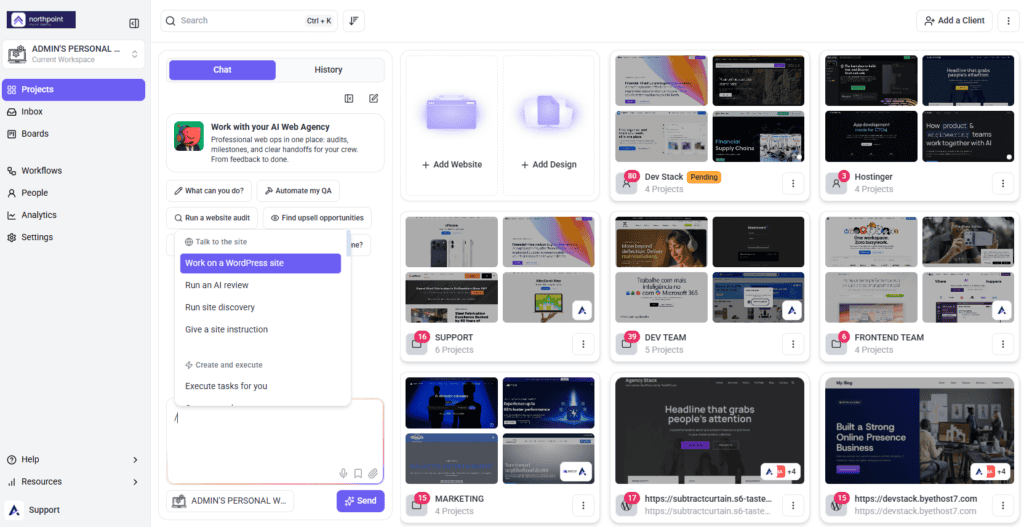
Type into the composer, or type / to open the slash-command menu.
On the right, use + Add Website or + Add Design to create a project, or select an existing project card to open it.
Press Ctrl+K to search, or use the sort and filter controls to reorder the grid.
slash-command menu for quickly selecting Claro actions
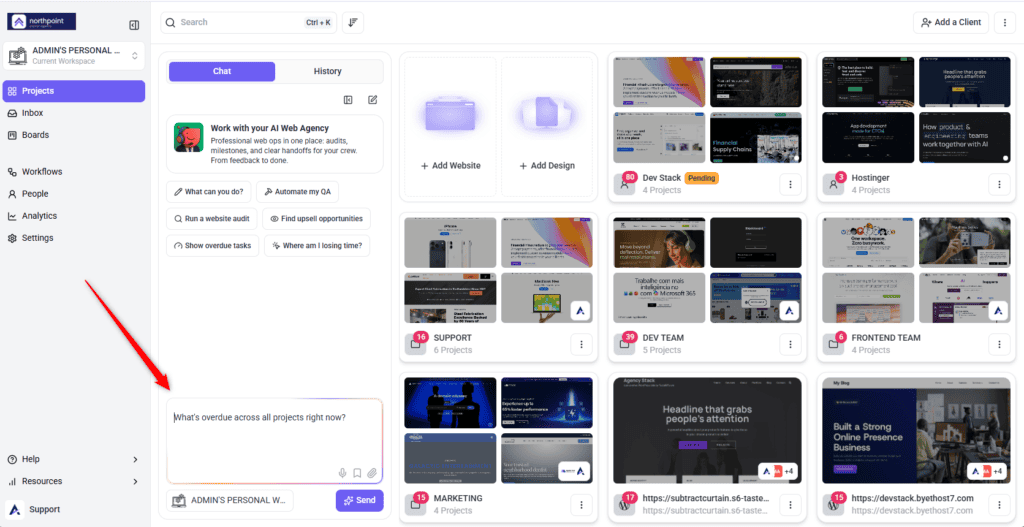
Prompt entered in the Claro chat composer to find overdue tasks across all projects
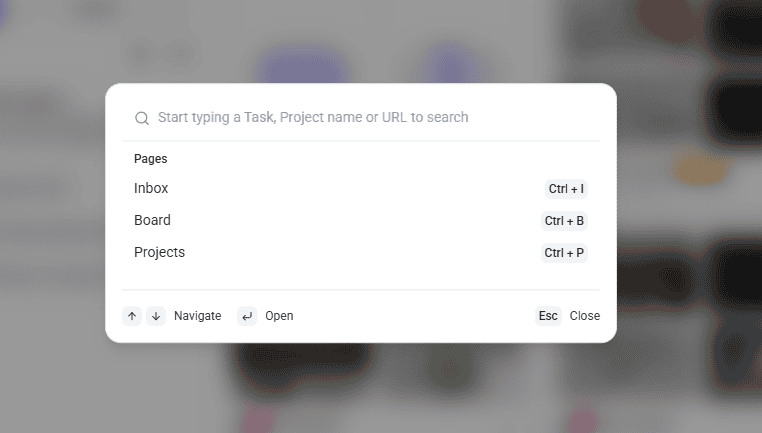
Global search opened with Ctrl+K, showing shortcuts to search and open pages, inbox items, boards, and projects.
Tip
Treat the quick-start prompts as a daily habit rather than a first-login curiosity. They’re the fastest route into the requests you’ll make most often.
Step 3: Inbox
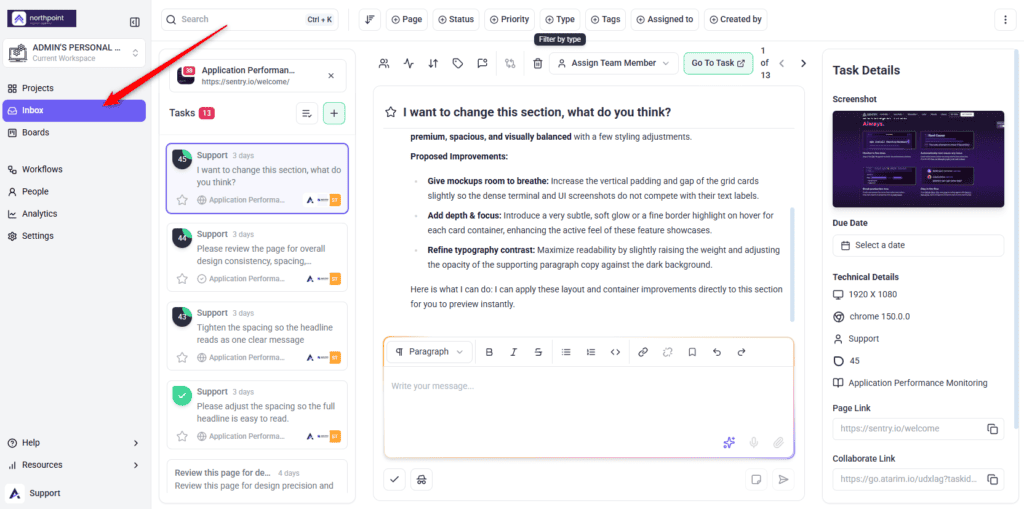
Brings email-based client requests into the same task system as everything else, so nothing ends up tracked in two places.
Use the project selector to filter to one project, or view everything across the workspace.
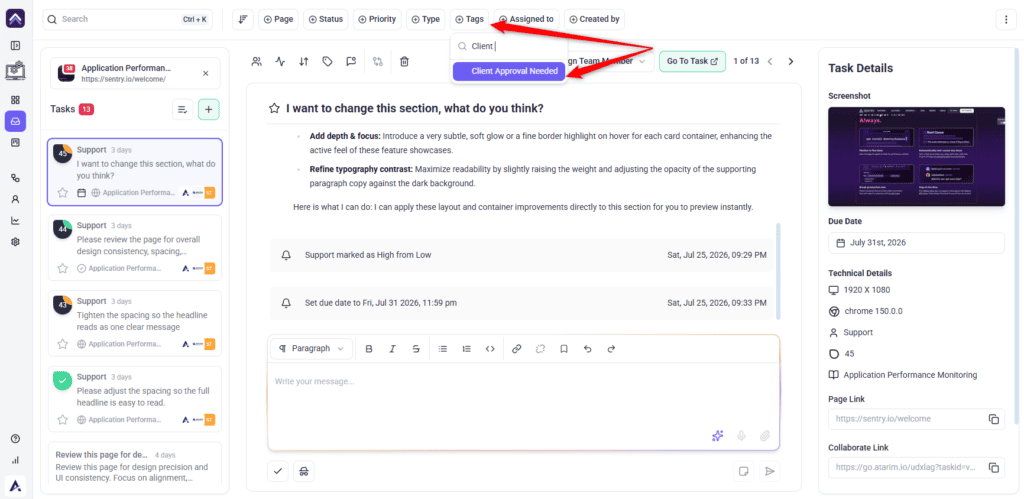
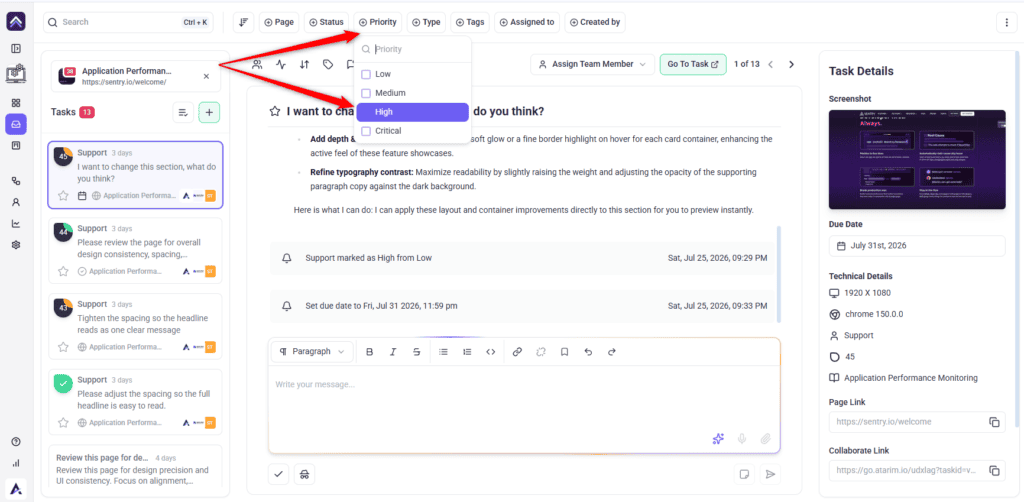
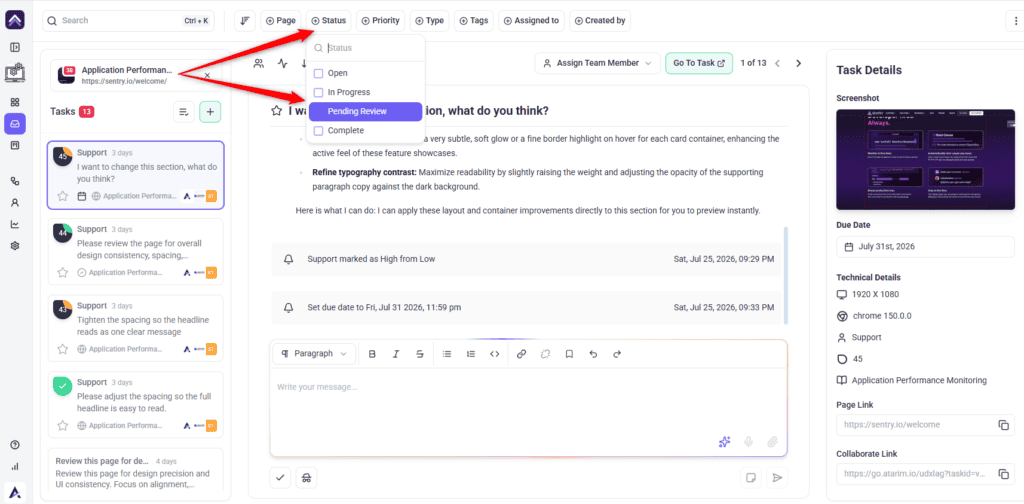
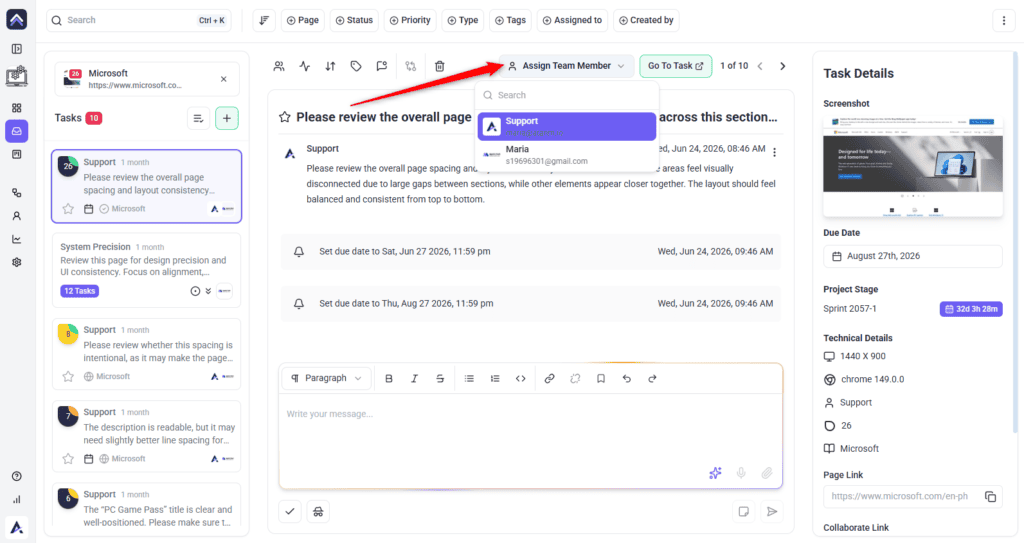
Search, sort, and filter by priority, tags, assignee, or status.
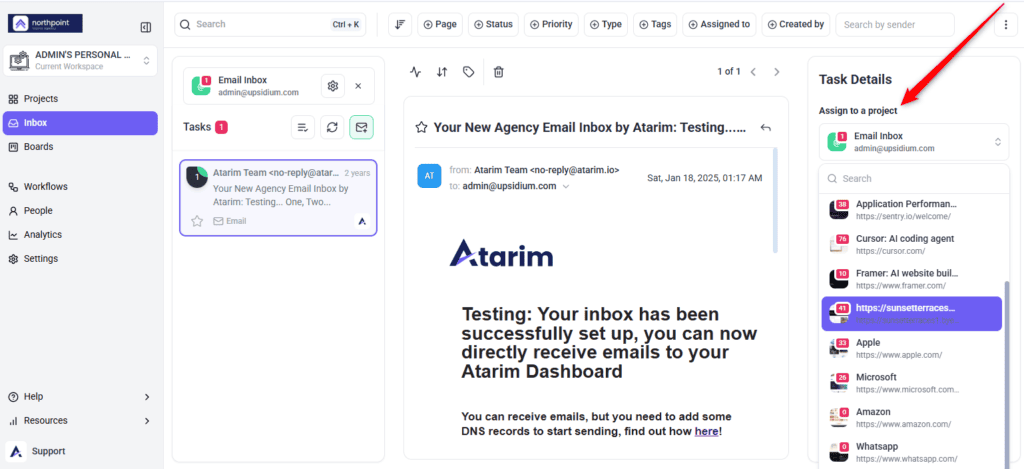
Select any entry to open it — read the original email, reply directly, or convert it into a task.
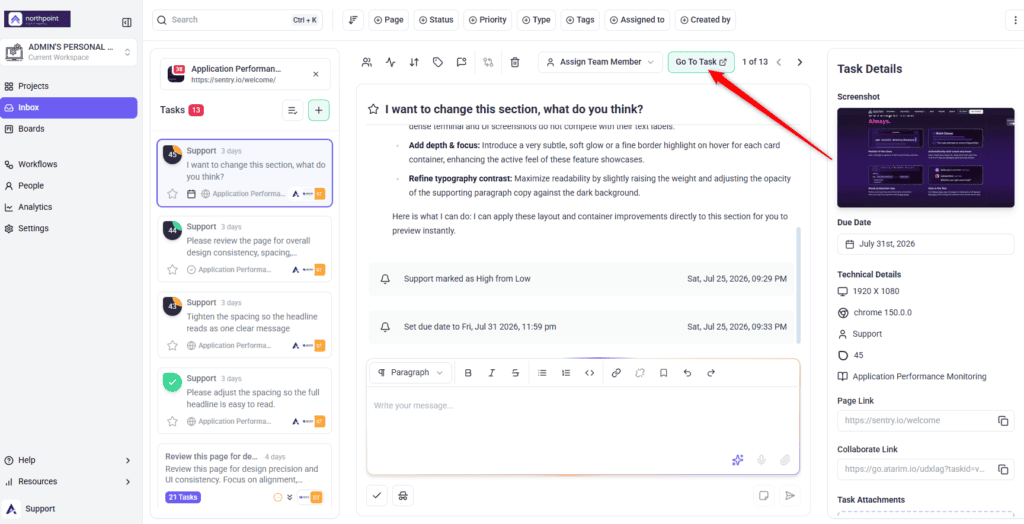
Use Go to Task to jump straight to that comment on the visual canvas.
If the list looks stale, use the refresh control beside the Inbox item to reload it.
Inbox screen
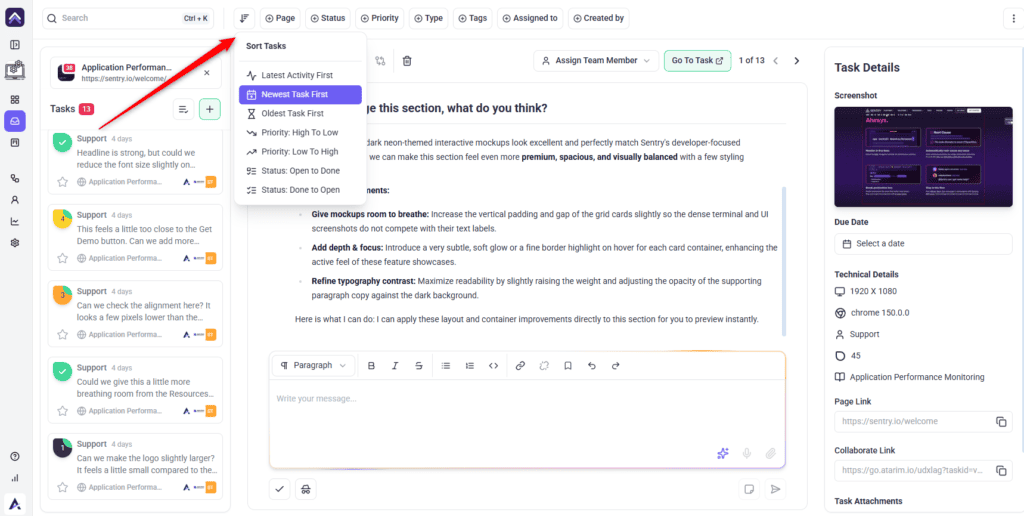
Sort Tasks menu with options to sort by activity, date, priority, or status.
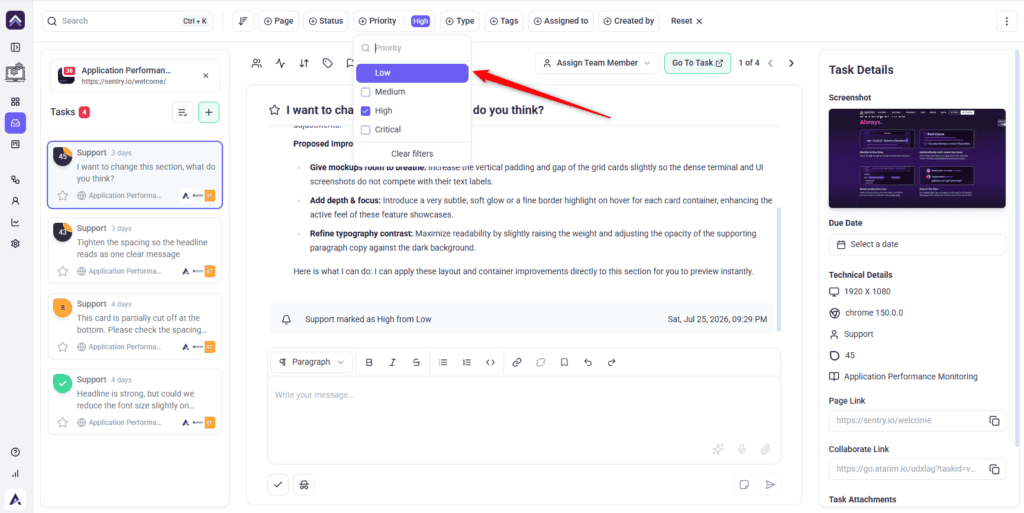
Tasks filtered by priority, with Low, Medium, High, and Critical option
Tags filter used to find tasks label
Priority filter with Low, Medium, High, and Critical options
Status filter with Open, In Progress, Pending Review, and Complete options
Assign Team Member menu for assigning the selected task to a workspace member.
Email being assigned to a project/Convert to a task
Go to Task button for opening the selected feedback directly on the visual
Warning
Mail sent to your own domain won’t land here until forwarding and domain verification are configured under Settings > Communication > Inbox Setup. Set this up before your first client invite rather than after a client has already emailed you.
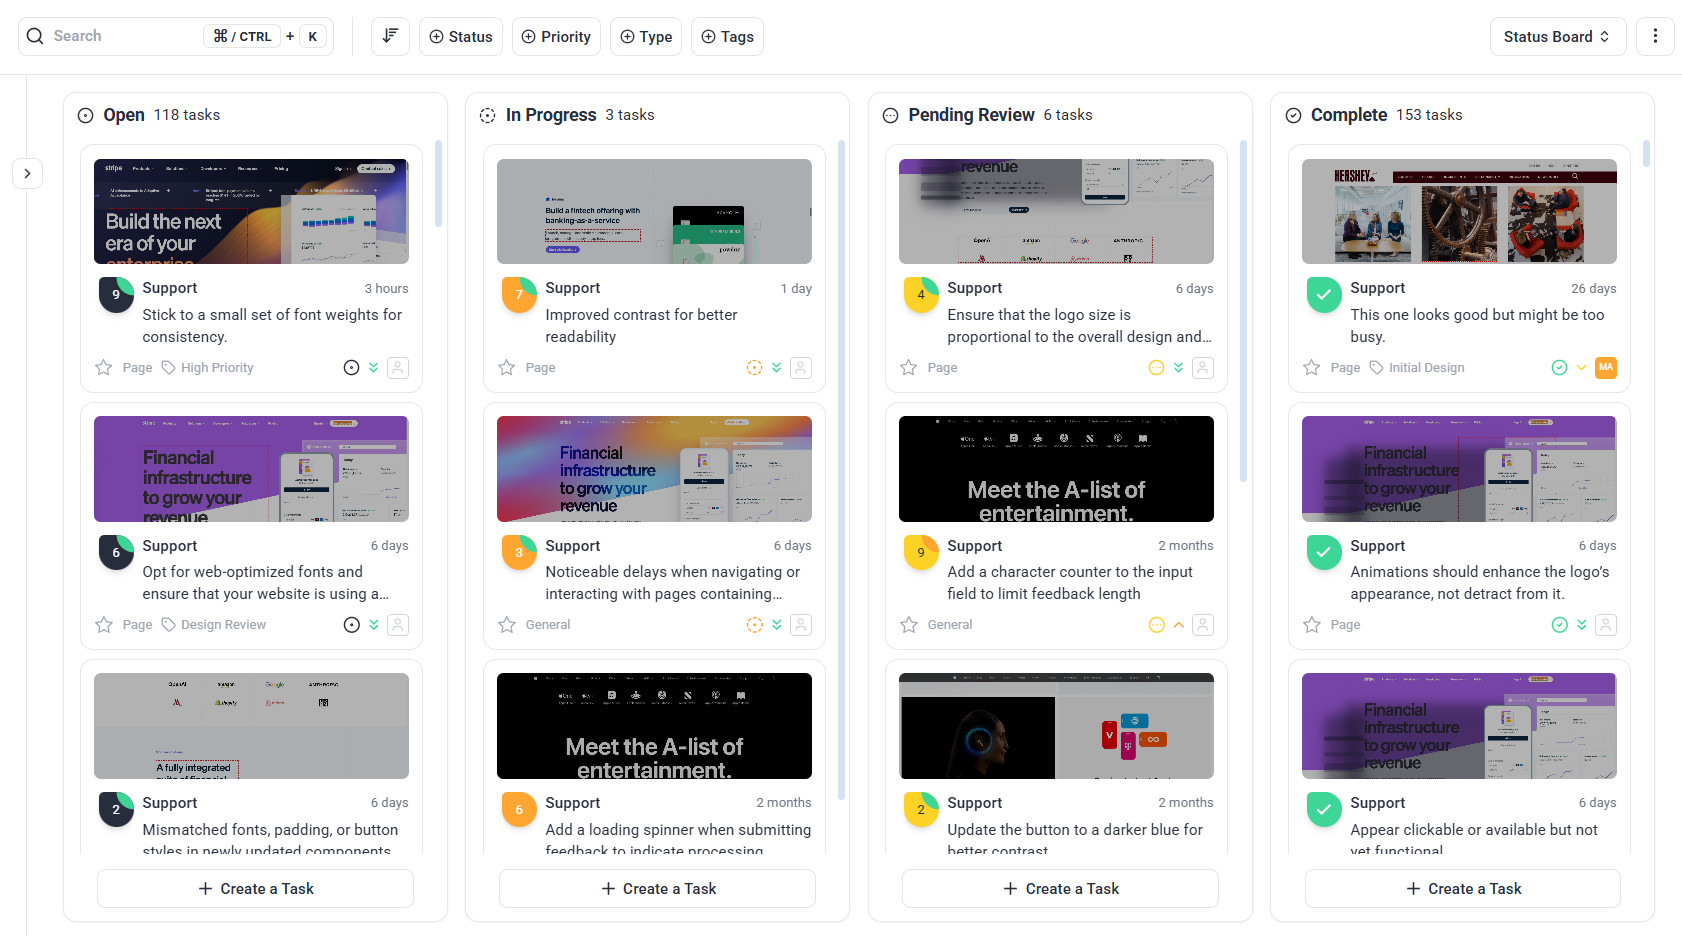
Choose a project to see its tasks laid out in columns.
Drag a card between columns to change its status — this updates the same status field visible everywhere else the task appears.
Read each card’s title, assignee, priority, and tags at a glance, or select one to open the full task.
Use the filter controls to narrow by tag, assignee, priority, or client.
Select multiple cards to reassign, retag, or reprioritize in bulk.
Boards View
Drag Cards Between Columns to Change Status
Tip
Check tags first when triaging a busy board. They surface client-initiated work fast, without opening every card.
Step 5: Workflows
Automations that fire on a schedule or in response to something happening — assigning tasks, updating statuses, sending notifications, running AI actions.
Instructions:
Select Workflows in the sidebar.
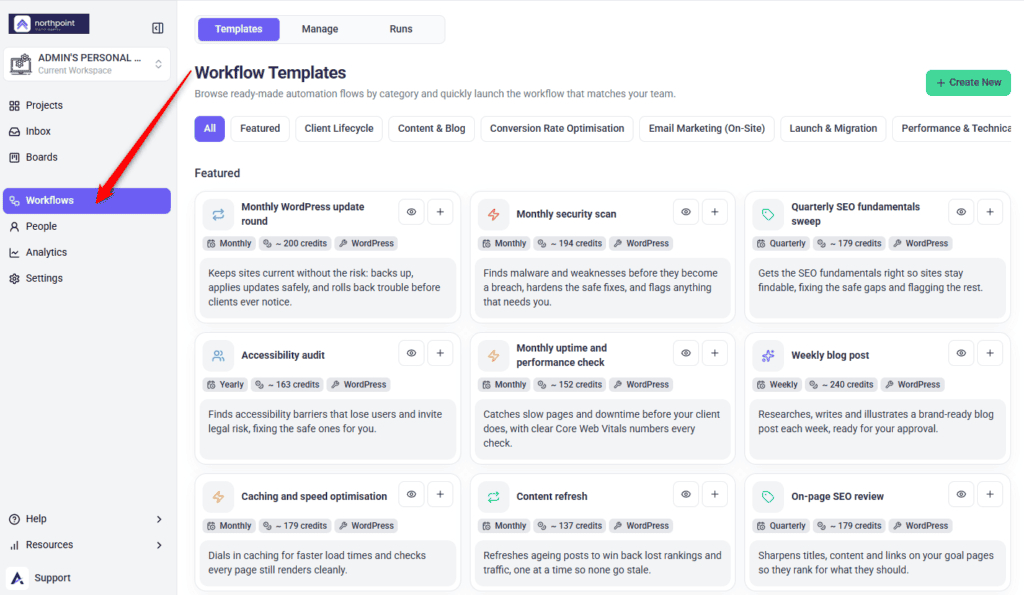
Browse the template library, or the workflows already running on your projects.
Select any workflow to open its canvas and view or edit its steps — triggers, actions, and branching.
Build a new one from a template, or start from scratch with a custom automation.
Attach it to the projects it should run on, then turn it on.
Template library with ready-made automations organized by category
Note
Workflows is hidden for Team Members and Collaborators by default. This is set at the account level rather than per workspace, so it isn’t something you can change from the User Permissions screen.
Step 6: People
Your team and your clients, with their roles, access, and activity.
Switch between your internal team and your clients.
Select a name to open that person’s profile.
Review or change their role, access, and notification preferences from the tabs on their profile.
Invite someone new from here, or revoke an existing member’s access.
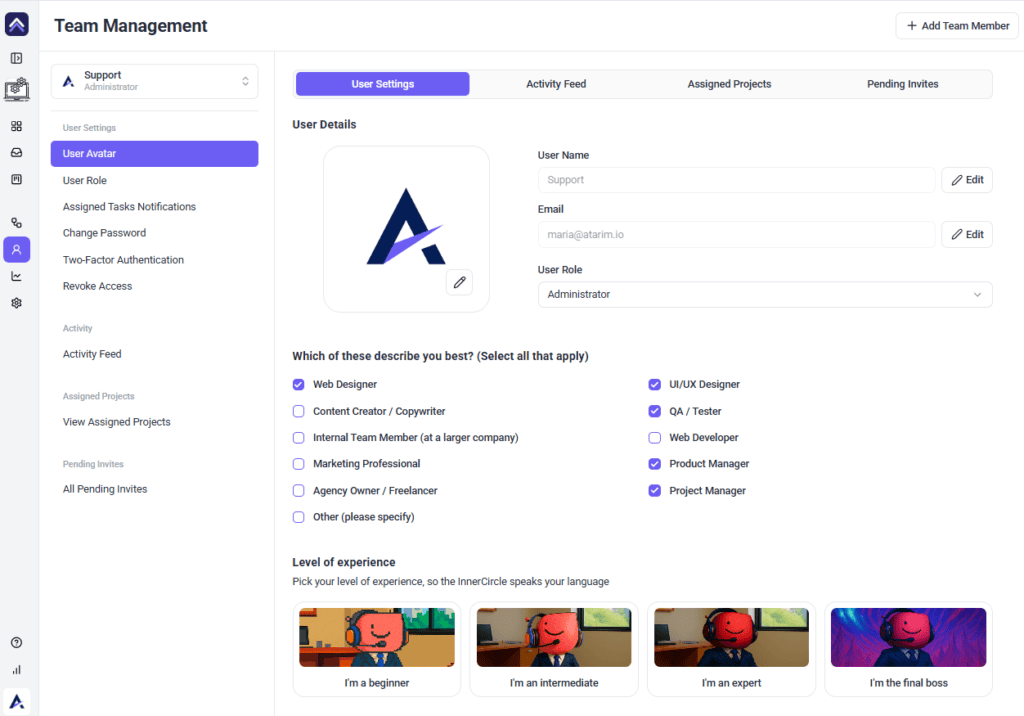
User profile with role, skills, experience level, activity, assigned projects, and access settings
Note
People is admin-only — it won’t appear in the sidebar for a Team Member. It’s also where your own profile lives: selecting Personal Settings in the Settings menu brings you here rather than opening a settings screen.
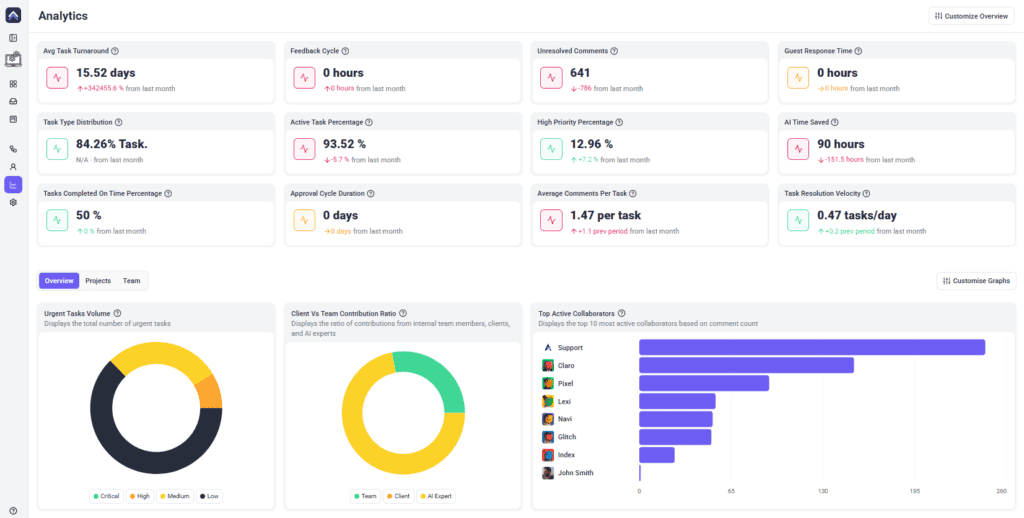
Review the headline activity metrics for the workspace.
Check the AI-specific metrics alongside them for a fuller picture.
Filter by date range, project, or team member to build a specific report.
Workspace activity metrics, AI performance data, task distribution charts, contribution ratios, and top collaborators
Recommendation
Pull an activity summary before client renewal conversations. It’s the easiest way to make ongoing AI-driven work visible to someone who only sees the finished result.
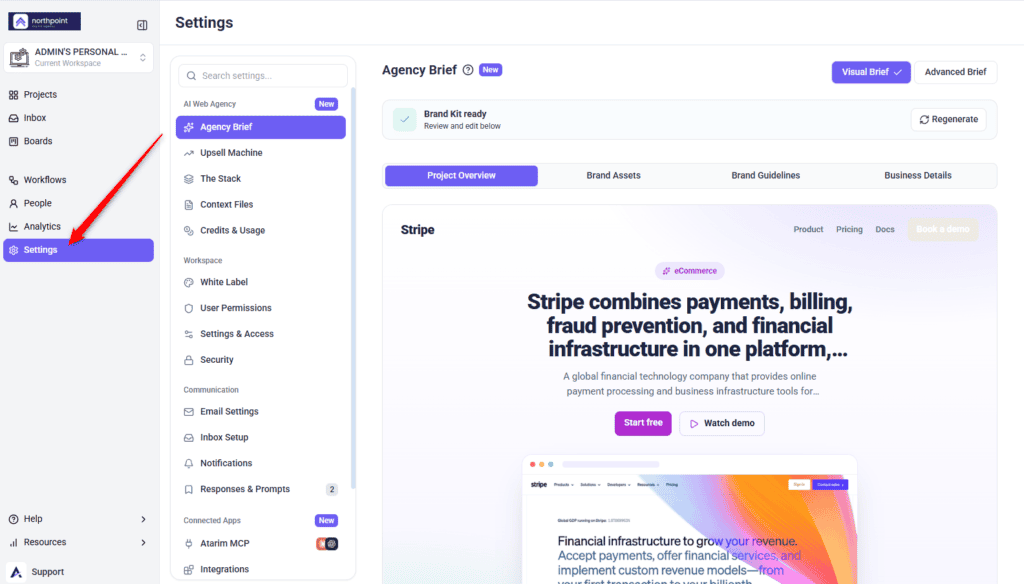
Find what you need under one of the five headings — AI Web Agency, Workspace, Communication, Connected Apps, or Account.
Select it. That screen opens in the panel on the right.
To find something fast, type into the Search settings… field at the top of the menu.
Workspace settings
Step 9: Help, Notifications, and Your Agency Identity
The bottom of the sidebar holds support links and your workspace’s branding.
Instructions:
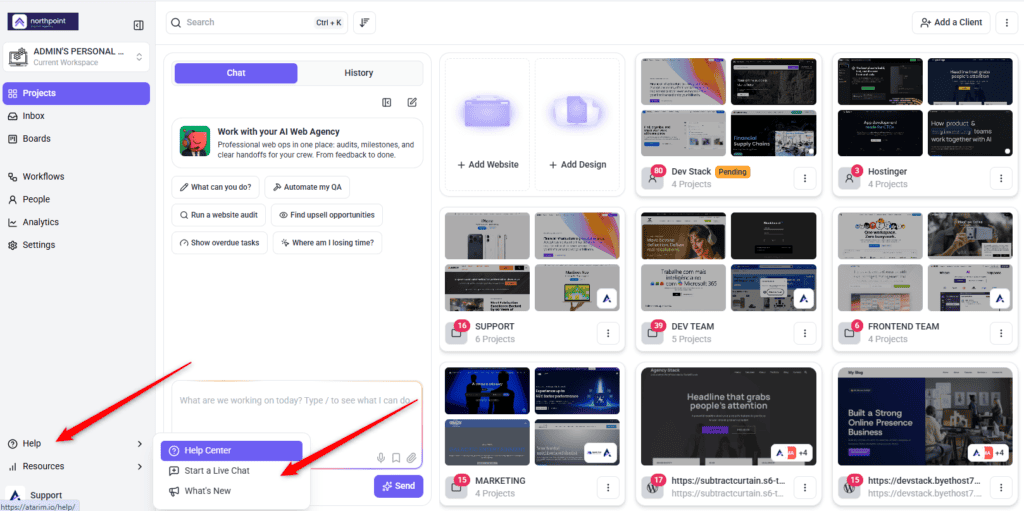
Select Help to reach the Help Center, or to start a live chat with support.
Select Resources for further documentation and material, where your workspace has it enabled.
Use the notification bell to see recent task updates, comments, and client feedback.
Your agency’s identity sits at the very bottom of the panel — this is what white-labeled clients see in place of Atarim.
Atarim Help menu
Tip
If a client mentions seeing your agency’s name rather than Atarim’s, that’s your White Label setup working as intended, not a display bug.
FAQs
Where do I land when I log in?
Projects. If workspace chat is enabled for your account, Claro’s chat panel sits on the left with your projects grid on the right; otherwise you’ll see the projects grid on its own.
How do I switch between workspaces I belong to?
Select the workspace name at the top of the sidebar and choose the one you want. The whole view reloads scoped to that workspace.
Why can’t I see the workspace switcher?
It only appears if you belong to more than one workspace, or if you have permission to view workspaces. With a single workspace there’s nothing to switch between.
Does switching workspaces filter my existing view?
No. Each workspace is a fully separate context — projects, team, and settings don’t carry across.
Why can’t I see People or Settings?
Both are restricted to the Owner and Administrators. They won’t appear in the sidebar for other roles at all.
A colleague mentioned a sidebar item I don’t have. Is something broken?
No. Items you don’t have access to are hidden rather than greyed out, so two people on the same workspace can see different sidebars depending on their role.
Where do I find my own profile?
Under People. Selecting Personal Settings in the Settings menu takes you there rather than opening a settings screen — it’s the only item in that menu that navigates away.
What happened to Forms and Time Entries?
Both are legacy features. They only appear on workspaces that still have legacy features enabled, so most sidebars won’t show them. If your team relies on either, speak to your administrator.
Conclusion
Projects is where you'll spend most of your time, but Inbox, Boards, Workflows, People, Analytics, and Settings are each one click away, and most have a dedicated article if you need the full depth.
The single most useful thing to internalise is that the sidebar is role-dependent. Items are hidden rather than disabled, so a sidebar that looks different from a colleague's is almost always a permissions difference — not a bug, and not something you've broken.
Tips & best practices
Use the quick-start prompts on Projects as a daily habit, not just a first-login curiosity
Check tags first when triaging a busy board — they surface client-initiated work fastest
Learn the five Settings category names so you're not hunting for a setting every time
Set up Inbox Setup and Email Settings before your first client invite; both apply only to mail sent afterwards
Pull an Analytics summary before renewal conversations to make ongoing work visible
If something's missing from your sidebar, check your permissions before assuming it's broken
To provide the best experiences, we use technologies like cookies to store and/or access device information. Consenting to these technologies will allow us to process data such as browsing behavior or unique IDs on this site. Not consenting or withdrawing consent, may adversely affect certain features and functions.
Functional
Always active
The technical storage or access is strictly necessary for the legitimate purpose of enabling the use of a specific service explicitly requested by the subscriber or user, or for the sole purpose of carrying out the transmission of a communication over an electronic communications network.
Preferences
The technical storage or access is necessary for the legitimate purpose of storing preferences that are not requested by the subscriber or user.
Statistics
The technical storage or access that is used exclusively for statistical purposes.The technical storage or access that is used exclusively for anonymous statistical purposes. Without a subpoena, voluntary compliance on the part of your Internet Service Provider, or additional records from a third party, information stored or retrieved for this purpose alone cannot usually be used to identify you.
Marketing
The technical storage or access is required to create user profiles to send advertising, or to track the user on a website or across several websites for similar marketing purposes.